


 Add to Reddit

The PCB
) |
The 320 GB Western Digital Scorpio has an 8 MB SDRAM buffer. In line with their trend to keep the PCB "clean" of surface-mounted components, Western Digital placed the SDRAM chip and controller chips on the reverse side of the PCB.
You can see the solder points on the PCB. Unfortunately, we still do not have a sufficiently small Torx screwdriver to remove the PCB. Hence, we cannot read the chips' details and tell you more about them. 
On the other hand, such a layout is good at preventing physical damage (albeit not static damage) to the surface-mounted components. The use of Torx screws, of course, prevents curious users (like us!) from taking apart the drive and unnecessarily increasing Western Digital's RMA rate. ![]()
Note : The "burnt" marks on the solder points are actually silver tarnish or discolouration due to the Pb-free process. It is a purely cosmetic defect and does not have any effect on performance or reliability.
The Connectors
) |
The 320 GB Scorpio is only available with a Serial ATA interface. It comes with native support for SATA 3Gb/s but can revert to the slower SATA 1.5Gb/s if the SATA controller cannot support the faster interface.
Like all Serial ATA drives, it comes the standard SATA data (left) and power (right) connectors and is hot-pluggable. That means you can connect and disconnect this hard drive to your PC while it's still running.
To the left side of these SATA connectors is the jumper block. Generally, you do not need to mess around with the jumper block. In fact, Western Digital did not even provide a jumper with the drive. It's really meant for the notebook manufacturer to tweak the drive for a particular build. For those who are interested, here are the three jumper settings available for the WD Scorpio hard drive.
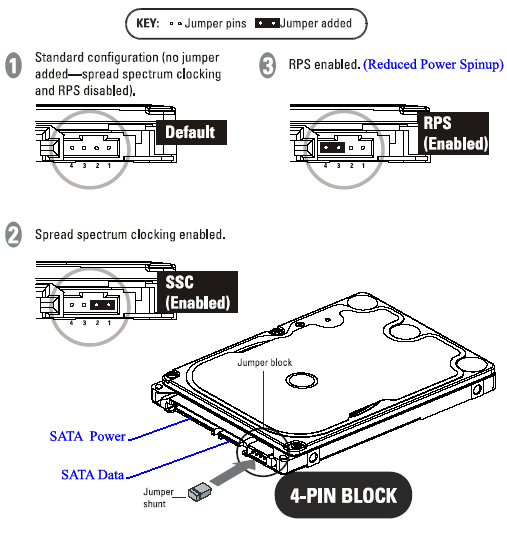
By default, spread spectrum clocking and reduced power spin-up are disabled. If you want to, you can use a jumper to enable either spread spectrum clocking or reduced power spin-up, but not both at the same time. However, it is recommended that you leave it at its default setting.
The Breather Hole
The Western Digital 320 GB Scorpio has a single breather hole on the top plate. You can see it circled in red in the picture below.
) |
The breather hole allows condensation inside the hard drive to escape. It also equalizes the hard drive's internal pressure with the ambient pressure. The hard drive needs it to function properly, so please make sure you do not occlude the hole!
<<< The Hard Drive, Specifications : Previous Page | Next Page : Testing The Caviar GP!, WinBench 99 Version 2.0 >>>