


 Add to Reddit

Fan Specifications
| Model | FD1212387B-2R |
| Bearing Type | Dual Ball Bearing |
| Rated Voltage (V) | 12 |
| Rated Current (mA) | 660 |
| Power Consumption (W) | 7.92 |
| Speed (rpm) | 2,800 |
| Air Flow (CFM) | 125.5 |
| Air Pressure (mm-Aq) | 7.6 |
| Noise Level (dbA) | 45.0 |
| Life (Hour) | 75,000 |
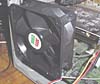
Installation
It's very easy to install the cooler. Just choose a suitable location for the cooler. Then remove the required back panel screws. I removed the screws on the 4th and 5th slot covers from the top (or from right if you install it with your casing lying on the floor). Then, place the fan above the graphic card and screw it in.
It's as simple as that. And because it doesn't involve modifying your graphics card, it will not void your card's warranty. No instruction sheet was included but you can check this page out if you really have no idea how to install the fan.

To ease the installation process, let your PC case lie horizontally on the floor before installing the cooler. Because I don't have much working space, I left the case standing up while I installed the cooler.
On each fan bracket, you should use two case screws, like the picture above shows. Although it comes with two fan brackets, you only need one. One fan bracket is enough to hold the weight of the fan. So, the extra fan bracket is pretty useless. But there's nothing wrong in using both the fan brackets though.
The fan is about 38mm thick. Therefore, I was not able to cover my case with this fan installed. Even if you have a wider case, you should allow at least a 2 cm gap in-between the case cover and the fan to permit sufficient air flow. As such, I had to leave my case open. Of course, you can always make a 'blow hole' on the case cover. :)