The NVIDIA Control Panel
It is very easy to overclock the NVIDIA GeForce 9800 GTX+. All you need to do is download and install their nTune utility or the newer System Tools with ESA Support. We will take a look at how nTune works. System Tools is very similar to nTune.
nTune consists of two components - the NVIDIA Monitor and the NVIDIA Control Panel. The NVIDIA Control Panel is what you are looking for.
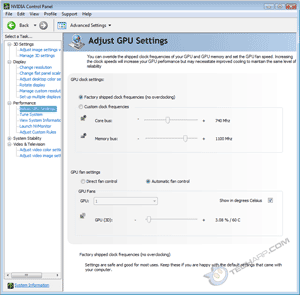
Load it up and you will gain access to a boatload of motherboard and GPU settings to mess with. To overclock the GeForce 9800 GTX+, head over to Performance -> Adjust GPU Settings.
Here, you will find more than just the options to overclock the GeForce 9800 GTX+. It also provides you with the option to directly modify the fan speed. No wonder the GeForce 9800 GTX+'s fan is so quiet. NVIDIA was only running it at 3.08% of its maximum fan speed!
It also displays the GPU's temperature. You can choose to display the temperature in Celsius or Fahrenheit. Now, let's get down to business.
Overclocking The GeForce 9800 GTX+
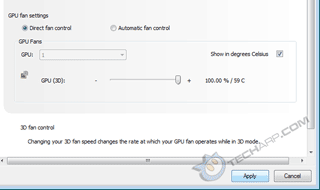
First, let's give that fan a big boost! With the fan running at 3.08%, the GPU temperature was at 60 °C. For maximum overclocking potential, let's ramp that fan all the way up to 100 %!
To do that, click on Direct fan control. This allows you to move the slider. Move it all the way to the right and click on the Apply button. You know you did the right thing if you hear the GeForce 9800 GTX+'s quiet fan spin up to a pretty loud whine. With the fan at maximum speed, we noted a marked 29 °C drop in the GPU temperature. Very nice!
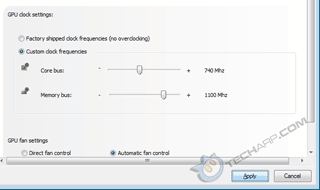
With that done, it's time to manipulate the core and memory bus speeds. Do note that overclocking the core also overclocks the shader processors (which run at a different clock speed) by a similar percentage. While you can manually overclock the shader processors using a third-party utility like RivaTuner, this is really unnecessary.
It is never a good idea to overclock both the core and memory bus simultaneously. Doing so makes it almost impossible to pinpoint the cause when the overclock fails. So, always overclock one component at a time. Choose either the core or the memory bus. It doesn't matter which you choose.
Let's say we start with the memory bus. Overclock it in small steps. On our testbed, each scroll step on the mouse increased the memory clock speed by 20 MHz. After selecting the new memory clock speed, click Apply. Then test it out using a real 3D game like Unreal Tournament 3 or Crysis.
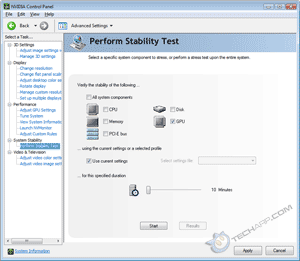
The NVIDIA Control Panel has a System Stability test option but from our experience, it's useless. It reported the card as stable even when it failed in real games.
When you test the card out, be sure to note any visual abnormalities like corrupted textures. The game may even hang. This is a sign that one or more of the memory chips are failing at that clock speed. When that happens, clock down the memory bus by one step.
If the game runs well, clock up the memory bus by another step. Keep doing this until you discover the highest clock speed where your GeForce 9800 GTX+'s memory chips are stable. For added stability (in case of temperature or voltage changes), you might want to downclock by one step.
Once you have pegged the best clock speed for your memory chips, it's time to overclock the GPU. Restore the memory bus to the default clock speed and repeat the same steps as above for the GPU. On our testbed, each scroll step on the mouse increased the GPU clock speed by 11 MHz. After clicking on the Apply button, test the card using a real 3D game.
Again, look for visual abnormalities in the game. Sometimes, the game may stall with the monitor blanking out for a moment. This is a sign that the GPU is running too hot and the graphics driver is attempting to recover. Usually, it succeeds and the game resumes. When this happens, clock down the GPU.
If the game runs well, clock up the GPU by another step. Keep doing this until you discover the highest clock speed at which the G92 GPU is stable. For added stability (in case of temperature or voltage changes), it would be a good idea to downclock the GPU by one step.
Finally, it's time to overclock both the GPU and the memory clock. Ramp both up to their maximum stable clock speeds and repeat the test with a real 3D game. If everything goes well, the game should run well without crashing or displaying corrupted textures. That's it! You have successfully overclocked your GeForce 9800 GTX+.
Support Tech ARP!
If you like our work, you can help support out work by visiting our sponsors, participate in the Tech ARP Forums, or even donate to our fund. Any help you can render is greatly appreciated!
<<< Introduction, The GeForce 9800 GTX+ Cooler : Previous Page | Next Page : How Well Did We Do?, Testing The Overclocked GeForce 9800 GTX+ >>>


 Add to Reddit


