


 Add to Reddit

Step 12 : Keep Your SSD Clean
|
)
Keep your SSD clean of anything but the files you absolutely need. This will ensure that your SSD will have plenty of "clean" blocks to write to at all times, and reduce wear and tear on the flash memory cells.
As most SSDs have limited capacities of 64 GB to 256 GB, we recommend that you limit the SSD to storing your operating system, software and documents. Everything else, especially media files like photos and videos, should be offloaded to a hard disk drive. In desktops, this is not a problem as it is easy enough to add one or more hard disk drives for file storage.
Laptops are a bit problematic. The DVD writer in dual-spindle laptops can be swapped out for a hard disk drive, which would allow the less critical files to be stored there. In smaller laptops that do not allow a second drive to be installed, or if you prefer to retain your DVD writer, you can store the less critical files in an external USB hard disk drive. Alternatively, you can opt for the Western Digital Black² Dual Drive.
Tech Explainer Solid state drives perform best when they are relatively empty. This is because the available blocks are a source of "clean" blocks to write to. As the SSD fills up with data, the number of empty blocks available for use drops. If you completely fill an SSD, there won't be any free blocks to use, forcing the drive to erase each and every block before it can be reused, which cripples its performance. That's why SSDs all reserve a portion of their flash memory cells, a technique known as over-provisioning. Over-provisioning is important as it increases performance by providing pre-erased blocks ready for use, even with the drive is completely filled up. However, this is only temporary as "dirty" blocks quickly accumulate as they get used and discarded. This is a problem with cheaper SSDs because they tend to have less over-provisioning than more expensive drives, due to cost reasons. This is where the Trim command and automatic garbage collection feature in newer SSDs come in. Trim helps the SSD's automatic garbage collection feature identify and clear "dirty" blocks so they can be reused as clean blocks. Unfortunately, garbage collection can only run when the SSD is idle, so if there is high and persistent activity, garbage collection may not kick in often enough to clear the dirty blocks. That's why it is important to have as large a buffer of free blocks as possible, and the best way to do that is to keep the SSD as empty as possible. |
| If you like this article, please share it! -> |
Step 13 : Don't Ever Defragment The SSD!
Do not ever defragment a solid state drive using a hard disk drive defragmentation software. It will greatly reduce the performance of the SSD right after defragmentation, and negatively impact its lifespan. This is of particular concern with Windows XP through Windows Vista because their built-in defragmentation utility is not SSD-aware and will defragment it as if it is a hard disk drive.
Fortunately, the HDD defragmenter built into Windows 7 and Windows 8, as well as newer defragmentation software like Raxco's PerfectDisk 12 are SSD-aware and will ignore solid state drives completely.
|
)
Tech Explainer Spatial fragmentation of data has no effect on SSD performance - fragmented bits of data are accessed just as quickly as nicely packed blocks, so it is pointless to "defragment" the data blocks in the traditional sense. In fact, defragmenting a solid state drive will rapidly exhaust the drive's supply of clean blocks, resulting in drastically poorer performance right after defragmentation. Even worse, defragmenting a solid state drive will also reduce its flash memory cells' lifespan by putting them under additional wear and tear. This is a very big problem for consumer-grade SSDs as they use MLC flash memory, which generally last about 5,000 program/erase cycles. In fact, their lifespan is expected to worsen as their fabrication process gets smaller. |
| If you like this article, please share it! -> |
Step 14 : Don't Enable ClearPageFileAtShutdown
Security-conscious Windows users will use the hidden Windows feature "ClearPageFileAtShutdown" to automatically clear the paging file when Windows shuts down. They do this to hopefully clear all traces of decrypted data from the paging file.
Unfortunately, enabling this option on an SSD would greatly increase the amount of writes and reduce its lifespan and performance. If you have a 4 GB paging file and you shut down your computer once a day, that could mean an extra 100 GB of extra writes to your SSD per month. So it is advisable to disable ClearPageFileAtShutdown if you are using an SSD.
If you are truly worried about security, boot Windows off a fully-encrypted drive. Then you needn't worry about your sensitive data being unencrypted in the paging file.
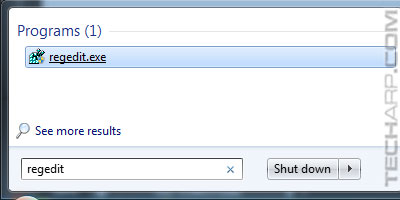
- Open the Registry Editor by typing "regedit" in the Start search box and clicking on regedit.exe as shown below, or going to drive:\Windows\regedit.exe.
-
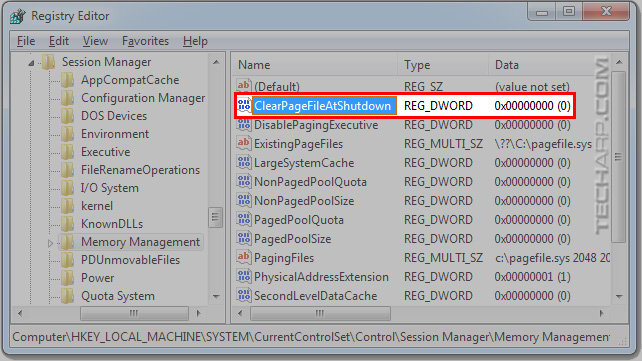
In the Registry Editor, go to HKEY_LOCAL_MACHINE\SYSTEM\CurrentControlSet\Control\Session Manager\Memory Management.
-
By default, the ClearPageFileAtShutdown value is set to 0 (disabled). There's no need to do anything if the value is 0.
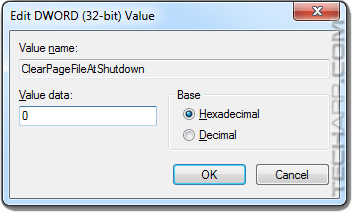
However, if you had earlier set this option to 1 (enabled), or you find that it's been set to 1, just double-click on the ClearPageFileAtShutdown option to edit it. Then type 0 into the Value data box and click OK.
-
You will need to restart Windows for the changes to take effect.
Tech Explainer One of the methods that people in the law enforcement / NSA / high-tech Mafia can use to access your confidential data is to inspect the contents of the paging file. This is because Microsoft Windows' virtual memory architecture automatically maps out idle memory pages to a paging file. Even if you use encryption to protect sensitive data on the hard disk drive, the encryption key (and any decrypted data that you are accessing) would be stored in the computer's memory. Windows will automatically map out some of these data to the paging file, which remains unencrypted even when Windows shuts down. That's why those who are worried about this kind of attack would usually use the hidden Windows feature "ClearPageFileAtShutdown" to automatically clear the paging file when Windows shuts down. However, this is not a foolproof method because when the option is enabled, Windows will only fill inactive pages with zeros. Active pages cannot be filled with zeros because they may be used by the system or other active processes. If you are truly worried about security, you should boot Windows off a fully-encrypted drive. Then you needn't worry about your sensitive data remaining unencrypted in the paging file. |
| If you like this article, please share it! -> |
Support Tech ARP!
If you like our work, you can help support out work by visiting our sponsors, participate in the Tech ARP Forums, or even donate to our fund. Any help you can render is greatly appreciated!
<<< How To Optimize Your SSD : Steps 10 - 11 : Previous Page | Next Page : How To Optimize Your SSD : Steps 15, Tips That Don't Work >>>
Support us by buying from Amazon.com! |
|
| Grab a FREE 30-day trial of Amazon Prime for free shipping, instant access to 40,000 movies and TV episodes and the Kindle Owners' Lending Library! | |