


 Add to Reddit

Hard-Modding The Radeon 9800
The modding procedures are same for all cards in the Radeon 9800 series. The only exception is the Radeon 9800 SE - its modding procedue may be slightly different.
First of all, you need to remove your card’s cooler. The area under the heatsink is exactly where you need to do all the modifications. The picture below is that of a Radeon 9800 Pro 256MB with a R360 core and Radeon 9800 XT PCB. The resistor layout around the R360 core, however, is exactly same as the R350 core.
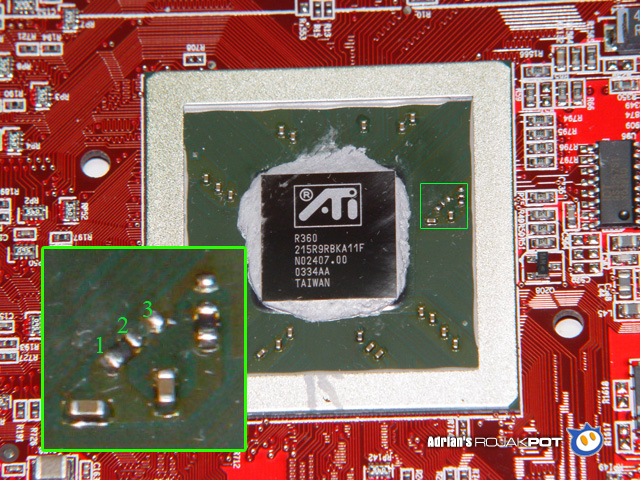
The Radeon 9800 Pro 256MB with R360 core and 9800XT PCB
Take a close look at the outlined area. All you need to do is remove the resistor connecting points 1-2 and resolder it to connect point 2-3.
Be very careful when you are doing this because the resistor is very tiny and you may lose it. Also, try not to let your soldering iron loiter on resistor for too long as excessive heat from the iron may damage it. If you can’t solder the resistor within 2-3 seconds, back off and wait for another few seconds. Then give it another go.
It’s not easy keeping the small resistor from moving around when you are trying to solder it in place. You can try pressing one end of the resistor while soldering the other end. I used a pocket knife to do that.
If you don’t do this, the resistor may stick to your soldering iron when
it touches the resistor. Remember, the resistor is very small at approximately
2mm x 1mm. It actually happened to me but fortunately I quickly grabbed my screwdriver
and knocked it off the soldering iron! ![]()
You must make sure the resistor makes proper contact with the solder points. Otherwise, your card won't work at all.
If you have a Radeon 9800 SE, you may need to resolder more than one resistor as ATI used the same trick to ‘transform’ their Radeon 9800 Pro cards into Radeon 9800 SE cards. Just make sure the resistor layout is same as the one outlined in the picture below.
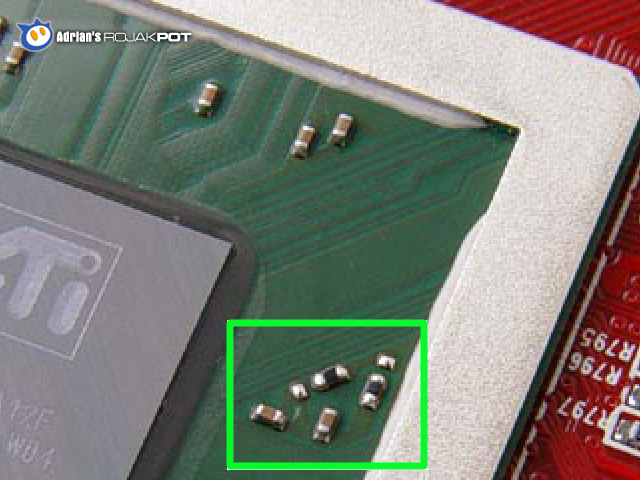
The resistor layout on the real ATI FireGL X2-256
Now that you have hard-modded your card, you will need to flash your card into
a true FireGL X2! ![]()
<<< Identifying Your Card (Continued) : Previous Page | Next Page : Finding The Right BIOS Images >>>