


 Add to Reddit

Step 6 : Let Windows Boot Faster
Believe it or not, Windows isn't doing anything during the boot logo animation if you are booting up Windows using an SSD. Your SSD is so fast that it actually has to wait for the logo animation to finish before it can continue loading Windows. So if you really want to experience the true performance of your SSD booting up Windows, turn off the Windows boot logo animation.
-
Open up the System Configuration utility by searching for "msconfig.exe" and clicking on it. You can also find it in drive:Windows\System32\.
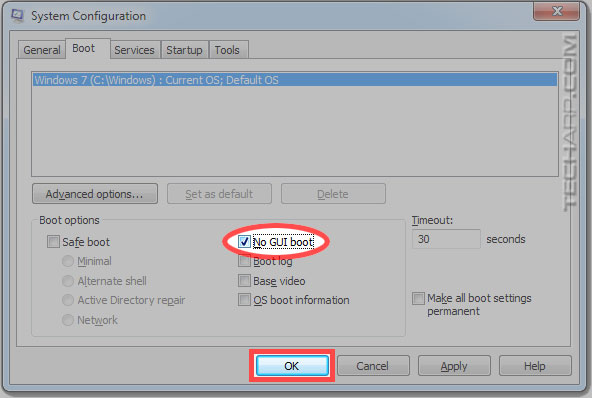
- Once you load it, click on the Boot tab.

-
In the Boot tab, look for the "No GUI boot" option and tick its checkbox.
-
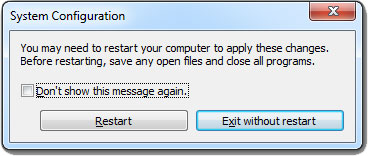
Click OK and System Configuration will ask you if you wish to restart Windows for the change to take effect. Either way, you will only see the effect when you restart Windows.
That's it! The next time you boot up Windows, revel in the faster boot speed!
Warning! If you schedule a boot-time disk check, disabling "No GUI boot" will prevent Windows from displaying its progress. You will see nothing but a blank screen, as CHKDSK scans the SSD for errors. To view the progress and any error message that may appear, you have to disable "No GUI boot" before you restart Windows to let it scan the SSD. |
| If you like this article, please share it! -> |
Step 7 : Verify That Trim Is Enabled
If you are using Microsoft Windows 7 or Windows 8, you can pretty much skip this step, because they are both optimized for SSDs and support the Trim command using their native AHCI drivers. However, if you are using a pretty old or slow SSD, Windows might not be able to detect it as an SSD. In addition, some data recovery software will disable Trim to aid recovery of data from SSDs. So it doesn't hurt to check.
-
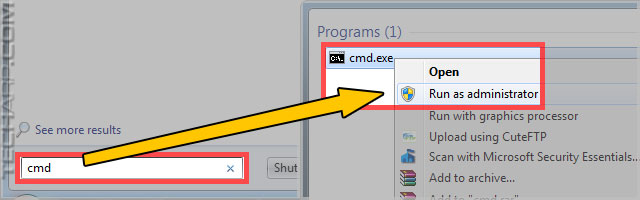
Open up the Command Prompt in Administrator mode. You can do this by searching for "cmd" and right clicking on it and select "Run as administrator".
-
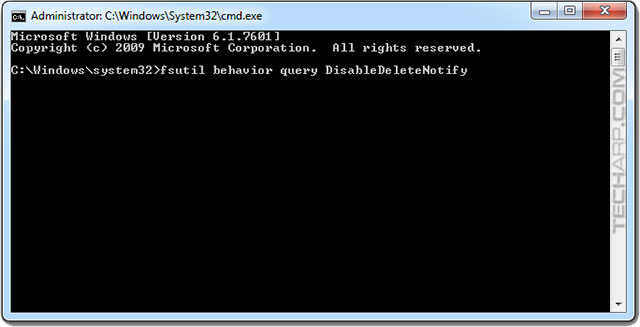
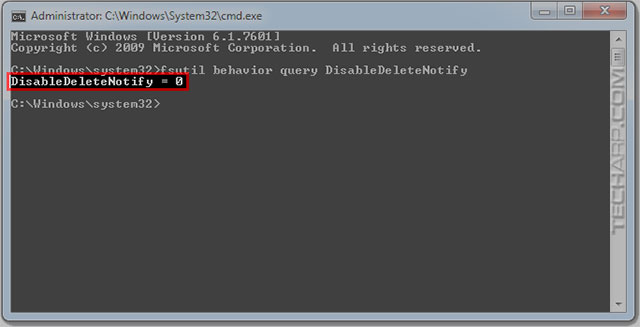
In the Command Prompt, type "fsutil behavior query DisableDeleteNotify".
-
When you press Enter, fsutil will return two possible DisableDeleteNotify results :
-
DisableDeleteNotify = 0 (Windows Trim commands are enabled)
- DisableDeleteNotify = 1 (Windows Trim commands are disabled)
-
In this example, you can see that Trim is enabled.
-
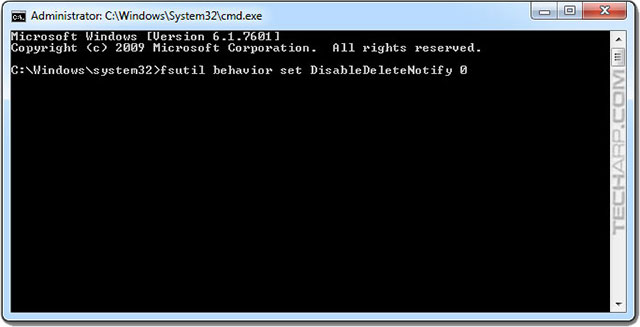
If Trim was disabled, you can enable it by typing "fsutil behavior set DisableDeleteNotify 0" and pressing Enter. You will need to restart Windows for the change to take effect.
Please note that Trim commands may be enabled in Windows 7 or Windows 8 but it won't matter if you are using an older third-party SATA driver that does not support Trim, like the Intel Rapid Storage Technology drivers prior to version 9.6. This is because fsutil only controls Trim commands for the native AHCI driver in Windows 7 and Windows 8. It won't do squat for third-party SATA drivers.
The latest version of all third-party SATA drivers should support Trim commands, so if you want to use them, please download the latest version. While you are at their website, it wouldn't hurt to verify that the version you are downloading supports Trim commands. Otherwise, stick to the native Windows 7 / 8 AHCI driver.
Tech Explainer The flash memory cells in SSDs are grouped into pages that are typically 4 KB in size, and data is read or written in pages. Writing data to the SSD is very fast, as long as there are empty pages to use. But once it runs out of empty pages, it will have to start clearing used pages because flash memory pages can only be written to if they are empty. If they contain even a single bit of data, they must first be erased before they can be written to. Unfortunately, the SSD cannot just erase a single page of flash memory if it wants to write to one page. When it comes to erasing flash memory, the SSD has to erase them in large blocks of pages, usually 128 pages or 512 KB at one go. Even if it's to write a single bit of data to a used block, the SSD has to :
This is known as the read-erase-modify-write cycle. As you can tell - it's not only a very time-consuming process, it also increases the wear and tear on the flash memory cells. That's why it is of great importance to reduce them, and this is where the Trim command comes in. Modern file systems use a trick to greatly improve performance. Whenever a file gets deleted, the file system does not command the drive to overwrite the affected sectors with a series of 0s or 1s or random bits. Instead, it just flags those sectors as "free space" or "not in use" - an instantaneous process. The drive itself isn't aware that a file has just been deleted. This is perfectly fine for hard disk drives because overwriting the used sectors that the file system flagged as "free space" with new data is no different from writing into empty sectors. However, this isn't the case with solid state drives, because as we pointed out above, it cannot write to used pages - they must be erased before they can be written to. If the SSD is not aware of any file deletion, it would retain the data instead of marking those pages as dirty so that they can be cleared in the background. When the file system actually commands the SSD to overwrite those pages, the SSD will have to initiate a read-erase-modify-write cycle because they still contain data. In fact, as far as the SSD is concerned, they contain valid data and it is merely "modifying" the contents. This greatly reduces the performance of the SSD and amplifies the amount of wear and tear on the flash memory. The Trim command allows the operating system to notify the SSD whenever files get deleted so that the SSD controller can mark, combine and queue the affected pages to be opportunistically cleared during idle periods. This will increase the chance that when the file system requests to write data to a previously used page, it will have been erased in the background and ready to be written to. Of course, the SSD itself must support the Trim command. |
| If you like this article, please share it! -> |
Support Tech ARP!
If you like our work, you can help support out work by visiting our sponsors, participate in the Tech ARP Forums, or even donate to our fund. Any help you can render is greatly appreciated!
<<< How To Optimize Your SSD : Steps 4 - 5 : Previous Page | Next Page : How To Optimize Your SSD : Steps 8 - 9 >>>
Support us by buying from Amazon.com! |
|
| Grab a FREE 30-day trial of Amazon Prime for free shipping, instant access to 40,000 movies and TV episodes and the Kindle Owners' Lending Library! | |