Before You Install The CPU Cooler
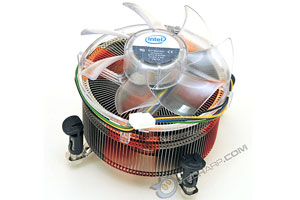
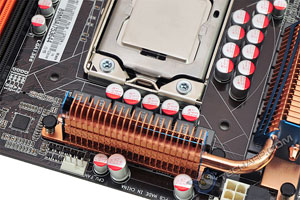
Before you install the CPU cooler, note the position of the 4-pin CPU fan header. Although it is not necessary, it's a good idea to align the cooler so that the fan's power cable is closest to the fan header. It just makes for a neater case.
 |
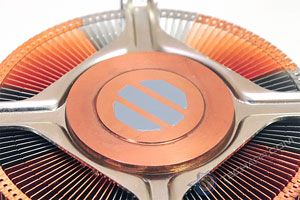
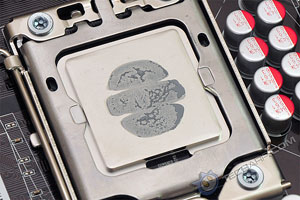
The standard Intel Core i7 CPU cooler comes with three stripes of thermal paste on the base (see first picture below). This is just enough to cover the elevated base that actually comes into contact with the CPU's heatspreader. The base of the cooler's heatsink is actually much smaller than the Core i7's heatspreader. Take a look at the second picture below.
We pressed the cooler down on the CPU so that the thermal paste would spread out and mark the actual contact area. You can see that only a small portion of the heatspreader is covered in thermal paste. Therefore, if you choose to use the standard CPU cooler (with its smaller base), you should NOT cover the entire heatspreader with thermal paste. It is enough to just cover the base of the cooler.
There's actually no need to even spread out the thermal paste on the heatsink's base before installing the stock cooler. This is because the three strips are designed to spread out equally and completely cover the base when the cooler is installed.
If you are using a third-party cooler with a much larger heatsink base, first determine which has a larger surface area - the heatsink base or the CPU heatspreader. It is a good idea to only apply enough thermal paste to cover the actual contact area and avoid applying to surfaces that will not come into contact.
In addition, the thermal paste should be applied thinly. It is very bad practice to apply thermal paste as if it was peanut butter. A nice, thick layer of peanut butter makes for a great sandwich but a thick layer of thermal paste is bad for thermal conductivity. Worse still, the excess will ooze out the side and make a mess of the CPU and its socket.
Support Tech ARP!
If you like our work, you can help support out work by visiting our sponsors, participate in the Tech ARP Forums, or even donate to our fund. Any help you can render is greatly appreciated!
|
|
Page |
Topic |
|
1 |
|||
2 |
|||
3 |
|||
4 |
|||
5 |
|||
6 |
• Dual / Triple Memory Channel Operation |
||
7 |
• Installing The Memory Modules |


 Add to Reddit


