


 Add to Reddit

Preparing The BIOS Flash Disk
Now that you have the the BIOS image and the BIOS flash utility, it’s time to prepare a clean DOS boot disk. This is because most flash utilities require the use of real mode DOS. The BIOS utility I used in this example, FlashROM 1.3, can only work in real mode DOS. Also, to prevent conflicts, nothing other than the necessary boot files should be loaded into this boot disk.
You can easily create a clean boot disk in Windows. Even Windows XP which does not support DOS comes with a utility that allows you to create your own DOS boot disk. Just remember to use a reliable floppy disk. A defective disk may cause the BIOS update to be corrupted.
In Windows XP, all you need to do is bring up the floppy format utility. Just right click on your floppy drive in Windows Explorer and click on Format… The following screen will appear.
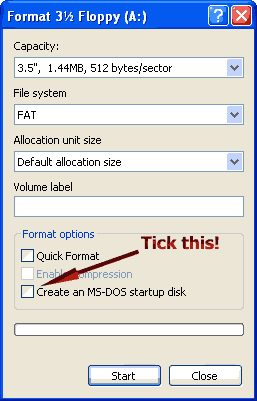
Among the format options, there’s an option called Create an MS-DOS startup disk. Check this option and format the floppy disk. Windows XP will format your floppy drive, make it bootable and copy all the necessary files for it to boot up into real mode DOS.
Once you have a clean DOS boot disk, all you need to do is extract the BIOS update file and the flash utility and copy them into the boot disk.
The BIOS update file or image usually has a .bin extension. Some come with a .rom extension. But they are all the same – just BIOS image files. Note down the name of the BIOS image file. It will come in useful later.