


 Add to Reddit

Repairing The Damage
Broken Capacitor Leg
First of all, I would like to apologize for not providing more photos in this guide. The nature of the work requires me to use both hands and constantly move the card around. The DSLR I use just doesn't work well in such situations. Maybe I will post up a video in the future, so stay tuned.
Let's start with the capacitor that has one leg broken from the pad.
-
Clean the pad of its original solder. Your current solder may not mix well with the old solder. You can use the solder wick or solder sucker to do this. All you need to do is tilt the cap slightly upwards, put the wick on the pad and heat the pad. Alternatively, heat the pad and suck up the solder.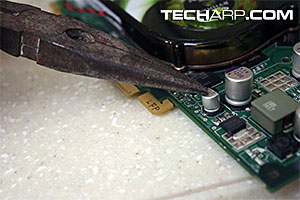
- Now, add a nice blob of solder of your own. Not too much though, just enough to cover the capacitor's legs when you push it into the solder blob.
- The leg of the capacitor you want to push into the pad should be bent downwards, from its 90° L position. If you imagine the top of the capacitor as 12 o'clock and the leg at 9 o'clock, bent it down to the 7 o'clock position.
- Now heat the pad again, and use the pliers to push the capacitor downwards so that its leg goes into the blob of molten solder. Use some force to bend the capacitor's leg as it touches the pad, so that it staightens out into its original 9 o'clock position.
- Let the joint cool.
)
If You Make Any Mistakes...
We're just human, and I'm quite sure most of us have a tendency to put too much solder on the pad. After all, it's better to have more than less, isn't it? Well, it does mean that you will have to clean the extra up.
Because the solder sucker sucks everything in one go, we need something that will give us more control and precision. So, we will use a solder wick to clean up the excess solder.
- Cut a small section of solder wick.
- Put the solder wick onto the area with excess solder.
- Put the soldering iron onto the area with the solder wick in front of it.
- Do this for 5 seconds, and then pull the wick and iron back at the same time. If the amount of solder absorbed isn't satisfactory, repeat this step. Do remember that the speed of solder collection varies with time and the amount of pressure you use when you push the iron.
- You should generally get a pretty decent joint like in the picture below.
) |
) |
Of course, you can do better with a hot air rework station, but those cost around $1600 each. I don't think the average Joe can afford one. Neither can I! ![]()
<<< A Closer Look At The Damage, The Workbench Setup : Previous Page | Next Page : Broken Capacitor, Badly Seated Capacitor >>>