


 Add to Reddit

Step 1 : Create A DOS Boot Disk
Since you will be messing around with the system while it is still running, it is advisable to remove or at least disconnect all hard disks in the system; and boot up using a DOS boot disk. So, you will need to create a DOS boot disk.
Here is a refresher for those who have not created DOS boot disks in a while. To create a DOS boot disk in Windows XP, here are the steps :-
- Insert a blank floppy disk into the floppy drive.
- Open Windows Explorer and right-click on the 3½ Floppy (A:) drive.
- Select the Format... option. The following screen will pop up.
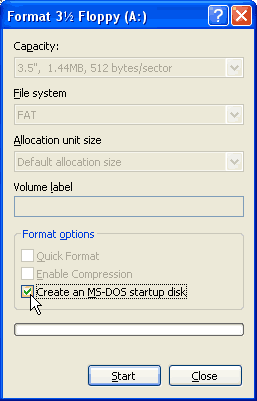
- Tick the Create an MS-DOS startup disk checkbox.
- Click the Start button and Windows XP will create a DOS boot disk.
Next, you will need to copy the BIOS image file for the corrupted BIOS chip as well as the BIOS flash utility into the DOS boot disk. You should get the latest BIOS image file from your motherboard manufacturer's website. BIOS image files usually have a .bin or .rom extension. Note down the filename of the BIOS image file for future reference. You will need it later.
Manufacturers usually bundle these BIOS image files with the appropriate BIOS flash utility in a compressed ZIP file for easy downloading. All you need to do is download the zipped file and extract its contents into the DOS boot disk.
Step 2 : Prepare A Hot Flash-Capable Computer
Not all computers can be used for hot flashing. For hot flashing purposes, the computer must use the same type of BIOS chip. BIOS chips come in either the form of a rectangular DIP (Dual In-line Package) or the square PLCC (Plastic Leaded Chip Carrier) package. Below are examples of PLCC BIOS chips :-
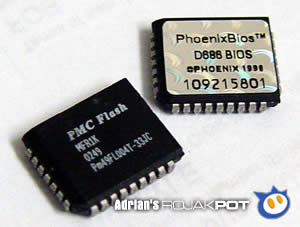
Needless to say, you cannot use a motherboard with a DIP BIOS chip to hot flash a PLCC BIOS chip.
Please note that every BIOS chip has a notch on one corner. That notch tells you how to align the chip for proper insertion into the socket. It is very important to insert the BIOS chip the right way. Inserting it the wrong way may cause damage to the BIOS chip and the motherboard.
Once you have a system that is compatible with your corrupted BIOS chip, it is highly recommended that you remove or disconnect all unnecessary hardware, especially the hard disks. This prevents any possibility of data loss on the computer that will be doing the hot flashing.