Graphics Card Repair
This is going to be a simple guide on repairing most physical damages that may afflict your graphics card or other add-in boards. Do note that this kind of work will void your card's warranty. So, if your card is still covered by warranty, you do not want to resort to this method.
Tools You Will Need
1. One 40-watt soldering iron with precise tip. I use a Hakko DASH 35W iron.
- 40 watts is a good figure to go with. The higher the wattage, the faster you can melt the solder BUT at the same time, a high wattage may cause heat-related damage. Therefore, 40W is a good figure to go with.
- Precise tips are nice because they allow for a higher heat density and more importantly, better soldering precision. Since SMD pads are pretty small, precise tips make it easier to solder components onto them. Smaller tips also help you avoid hitting any other components as you work.
2. A multimeter with a continuity beeper. I use a Fluke 179 multimeter.
- This allows you to check your work after you're done. If the multimeter beeps for a second or so and then stops, that means your work was successful.
- Multimeters also allow you to check your solder connections, the state of the pads, traces and other things.
3. A solder sucker. I use a Hakko DS-1 solder sucker.
- As its name says, it sucks solder. It allows you to fix bad patches in your work, e.g. when you put on a little too much solder.
- It also allows you to remove old solder and stuff like that. Very handy indeed.
4. Some solder wick. I generally use either Kester or Hakko solder wicks.
- Solder wicks are reels of flux-impregnated copper braids. When you heat it up on top of solder, it absorbs the molten solder. Essentially, they work like solder suckers, but far greater control and precision.
5. Pliers and cutters.
- Somehow, you'll always need these handy tools, so keep them close. Any brand will do, as long as they can fit into tight spaces and are easy to handle.
6. Solder!
- Obviously, you will need some solder to well, solder stuff. For SMD work, I recommend eutectic solders because they cool fast and don't slur and cold joint as easily. Remember to get thinner solders, because they allow for more precise work and faster heating.
Important Precautions
1. Do not rush any soldering jobs. You can take your time when you solder SMD components. They are designed to withstand reflow soldering for up to ten seconds. The same doesn't apply for through hole though. Just plot out your plan of action and take your time. Rushing yourself will often result in more errors and time wasted on corrections.
2. Clean and tin your iron tip before you start on a joint. It makes everything much easier. You can try my technique which I call scraping. All you need is an old heatsink. Just use its fins to scrape residue off the iron while it's still hot.
3. You need lots and lots of bright lights where you work. Light is one of the most under-rated issues with any workspace. You need bright and white lights. Flexible study lamps are perfect for this role. You can't solder what you can't see, can you? ![]()
4. Get some eye protection, my friends! Eutectic solder and large diameter solders have a tendency to splash. Ouch!
The Sacrificial Victims
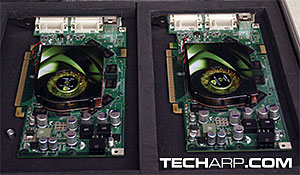
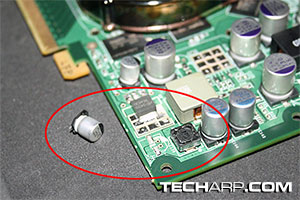
Now before we start on the guide, let's take a look at the sacrificial victims. We have two damaged NVIDIA graphics cards on our hands. One is missing a 1 microhenry SMD choke with a bent capacitor. The other has one capacitor's legs torn off the pad with another capacitor that got torn off its pad.
Sorry for the poorly-focused pictures. The loss of my camera's eyepiece and my astigmatism were no help at all. But you should be able to see the capacitor that fell off, and its pad on the card.
The card with the missing choke actually works, but I don't think it's stable. No good at all, but that's why we are going to repair it.


 Add to Reddit


