


 Add to Reddit

Damaged Lens Motor
|
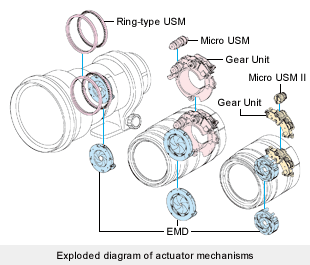
This is a problem only for lenses that have an integrated electric motor to drive the focusing mechanism. This is less of a problem with newer lenses that use ultrasonic motors but they are more expensive to fix.
To test the lens motor, cover the lens with its lens cap. Then half-press the shutter release button. This will cause the auto-focus action to seek from the closest range to infinity. Make sure the auto-focus action is smooth and not "sticky" - it should not "jerk" or "hesitate" while it seeks from the closest focal point to infinity, and any whirring noise it makes should be smooth and even. Ideally, the manual focus ring should not move at all during the test.
If the lens does not appear to be focusing smoothly, or if the manual focus ring actually moves, then the lens motor may be suspect. Similarly, if the lens appears to focus normally but the noise generated by the motor sounds iffy (rough or uneven), you should think twice. Do note that older lenses use non-ultrasonic motors which are much louder, so don't avoid them just because they sound louder than newer lenses you are used to.
Fixing the lens motor is expensive. The repair job for the ultrasonic motor of a Nikon AF-S lens, for example, can cost anywhere from US$200-300, depending on what parts they need to change.
Malfunctioning Image Stabilizer
|
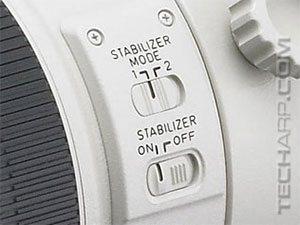
This obviously only applies to lenses that have built-in optical image stabilizer, like Nikon VR (Vibration Reduction) and Canon IS (Image Stabilization). Such a feature involves a complex of electromagnets and gyroscopic sensors to detect vibration and adjust the floating lens elements to eliminate or reduce camera shake.
To find out if the len's built-in image stabilizer is working, listen closely when you half-press the shutter release button and release it. You should hear a 'tick' during the press, and a 'tock' during the release. This is more obvious with the first generation image stabilizers but you can still feel the image stabilizer working if you pay attention.
The lens will work just fine, even if its image stabilizer fails. Optically and electrically, there's nothing to impede you from using the lens to take great photos. You will only lose the image stabilization assistance while holding the lens with your hands, which may result in less than ideal photos if lighting conditions are not favourable.
Repairing the image stabilizer isn't cheap because of the components it involves. Nikon, for example, charges US$200 to replace a malfunctioning image stabilizer.
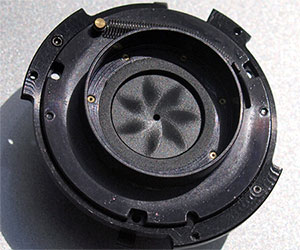
Oily Aperture Blades
In old lenses, especially those that are exposed to high temperatures, lubricating oil from the lens' focusing helicoid may leak into the aperture blades. Oily aperture blades affect the speed at which the blades open and close, which may cause your photos to be over- or under-exposured. The excess oil may also splatter onto internal lens elements, causing focus and contrast issues. Over time, the drying oil will eventually lead to sticky aperture blades (see next page).
You can check for oil on the aperture blades by looking at the stopped-down lens in good light. If the lens does not automatically stop down when removed from the camera, you should stop down the lens using the aperture ring or the camera.
By varying the angle of light shining on the aperture blades, you may see oily stains on the blades. They will look shinier and darker than the rest of the blades. In bad cases, you can even see the pooling of some oil on the aperture blades. Make sure you check both sides of the blades, by looking at the aperture blades through both ends of the lens.
|
|
)
If you detect any oily blades, you should send the lens to be disassembled and the blades cleaned and dried. The cost of cleaning the blades can be quite costly at anywhere from US$10 to US$100, so factor that into the cost of buying the lens. Sometimes, it's cheaper to just get a new one!
Sticky Aperture Blades
If oily aperture blades are not serviced, the oil eventually congeals and causes the aperture blades to stick to each other. As a result, the aperture blades will either open or close slowly, or part of the aperture may not open or close at all. The end result? Over-exposed or under-exposed photos, depending on whether the blades are stuck in the open or closed position.
|
|
)
)
In cameras with a Depth Of Field (DOF) Preview feature, you can check by stopping the lens' aperture down to its smallest aperture (for example, f/22). Then, take a look through the camera's viewfinder and press the DOF Preview button.
You should hear the aperture blades snap quickly into place and the viewfinder instantly darken. If the aperture snap sounds prolonged or if there's a delay in the darkening of the viewfinder, then it's possible that the aperture blades are sticky. Of course, you will have to be quite experienced to make out such delays.
|
|
Nikon D70 viewfinder |
Nikon D70 viewfinder |
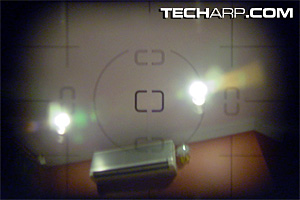
Also, check for uniformity in that darkness. If the aperture blades are working fine, the viewfinder should appear uniformly dark. If the darkness is not uniform, that's another clue that at least one of the aperture blades may be stuck.
You can also take a good look at the aperture blades through the front elements. Just set the aperture as small as possible and press and release the DOF Preview button. You can see the aperture blades snapping close and open again. They should all snap quickly and simultaneously. If they appear to be sluggish or if some blades do not open or close properly, then the lens has sticky aperture blades.
If you do not have a camera handy, you can still check the lens for sticky aperture blades by looking at the stopped-down lens in good light and flicking the aperture pin near the lens' rear element. The aperture should open and close quickly and smoothly.
) |
If one or more of the aperture blades appear sluggish or stuck, then you have a lens with sticky aperture blades. You will need to send it in for the blades to be cleaned, which can be quite expensive at anywhere from US$10 to US$100. Unless the lens is offered at a very low price, it is often cheaper to just buy a new lens, or wait for a better example.
Support Tech ARP!
If you like our work, you can help support out work by visiting our sponsors, participate in the Tech ARP Forums, or even donate to our fund. Any help you can render is greatly appreciated!
<<< Damaged Filter Rings, Loose Switches, Dust Inside The Lens, Tight Or Gritty Rings, Loose Zoom Action, Damaged Zoom Action, Damaged Focusing Helicoid : Previous Page | Next Page : Eroded Lens Coatings, Scratched Lens Elements, Chipped Lens Elements >>>
Support us by buying from Amazon.com! |
|
| Grab a FREE 30-day trial of Amazon Prime for free shipping, instant access to 40,000 movies and TV episodes and the Kindle Owners' Lending Library! | |