So How Do You Lap?
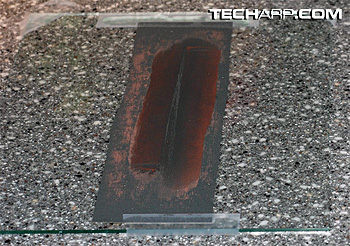
This is my preferred choice of lapping "equipment" - 8" x 10" piece of glass on a flat countertop. You can see that I cut the sandpaper into a thin strip that is about 2-3X wider than the surface I want to lap and attached it to the glass with some tape. The glass is, in turn, taped down to the countertop to keep everything immobilized.
You'll want to moisten the sandpaper with some mild soapy water. Try 1 drop of dish soap in 1 liter of water. Then blot away any pool of water. Then, simply place the thermal contact surface of the CPU or heatsink onto the sandpaper and gently move it front-to-back. I do not recommend doing it in circles since it tends to give you uneven results.
Remember, you're after a flat CPU or heatsink base here. So don't push down on it as you lap. The weight of your hands will suffice, without extra pressure. Go slowly so you don't use uneven pressure. After about 30 laps front-to-back, gently blot off the CPU/heatsink surface with a moist paper towel to remove the metal particles you just sanded off.
Then rotated CPU/heatsink 90°, and repeat 30 more laps front-to-back. Clean off the sand paper (by adding more water, and then blotting it damp and repeat). I'd recommend changing the sand paper frequently since it is really doing all the hard work for you. That's basically it.
You can start with 400 grit sandpaper and lap until you can't see variations in the surface of the chip. Then move up to 600 grit or 800 grit, and finish off with 1000 or 1200 grit sandpaper. I finished my lappings only with 800 and 1000 grit sandpapers. It just takes longer with finer grits. Remember though that the key is to achieve a FLAT, smooth surface. Not a shiny one. I would recommend that you do NOT polish the heatsink base or CPU heatspreader with a metal polish since you'll leave behind residue that will hurt the heat transfer.
You can test the flatness at any point during the lapping process by carefully placing a razor blade across the thermal contact surface of the CPU or heatsink, and looking at the point where the razor meets the CPU/heatsink. Now position your eye so that it is level with the CPU/heatsink surface and aim a light source (a lamp or flashlight will do nicely) behind the razor blade. Do you see any light coming though? If you do, then it's not flat enough and you need to keep at it.
Another test you can do is to take a black marker pen and make about 9 dots in a 3x3 grid on the surface of the heatsink base or CPU's heatspreader. Lap about 5 times, rotate, and do 5 more. Now look at the dots... did they wear off evenly? If not, keep at it. You can also simply draw an "X" from corner to corner on the heatsink/CPU surface and do this as well. Again, you'll looking for even wear.
<<< Overall Results, Temperature Variation Between CPU Cores : Previous Page | Next Page : Conclusion >>>


 Add to Reddit

