


 Add to Reddit

Installing The PSU
 We will start with the installation of the PSU( Power Supply Unit). We will be installing the NZXT PP-800 800 watt PSU which will be the subject of our next NZXT review. Ironically, this brings about our first issue with the Tempest case and the manual provided with it.
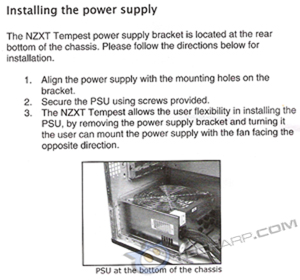
This issue arose when we noticed the bottom of the Tempest case was solid with no ventilation holes or cut-outs. If we choose to invert the PSU as mentioned in the Tempest manual, there would be no way for it to draw fresh air from outside the case. The Coolermaster case we were using earlier did not have this problem as it had ventilation holes at its base.
There are two ways to effectively mount the PSU in a case that has a bottom-mounted PSU. One is to mount it so that the intake fan is facing upwards. This allows it to draw hot air from within the case and other components. The other way is to invert the PSU so that the intake fan draws fresh air from outside the case.
) |
) |
) |
) |
) |
We will continue with the first option as the Tempest case does not allow for the second option. Just slide the PSU into place and attach it with the 4 supplied screws. All wiring will be completed in the final stage, so let's go on to the installation of the motherboard.
Installing The Motherboard
We will be installing a Gigabyte GA-X38-DQ6 motherboard into the NZXT Tempest.For simplicity's sake, the CPU and CPU cooler have already been pre-installed. This brings up the first convenient feature of the Tempest case - installing the standoffs for the bolts holding the motherboard.
We have all swapped motherboards and sometimes their different layouts mean the location of the standoffs differ as well. NZXT takes care of this by numbering the standoff locations in the case by stamping them right into the case. They also included a sticker inside the case that shows you where to install the standoffs for each type of ATX motherboard. Very handy!
) |
) |
As a rule of thumb, I always check for clearance and alignment of the motherboard after the standoffs are installed. Then I install the I/O plate and the motherboard using the supplied screws. As you can see, we had no issues installing both the motherboard and the I/O plate. We will leave the wiring till the end.
) |
) |
Another nice feature of the Tempest case is the two recessed 140 mm top fans. They do not restrict the Coolermaster Hyper212 CPU cooler at all, even with 2 fans installed. Clearance with the rear-mounted chassis fan wasn't an issue either. The top panel was also predrilled for a 120 mm radiator if the system uses a liquid cooling solution.
) |
Now, we get install the drives.
Support Tech ARP!
If you like our work, you can help support out work by visiting our sponsors, participate in the Tech ARP Forums, or even donate to our fund. Any help you can render is greatly appreciated!
<<< Introduction, Packaging, Specifications : Previous Page | Next Page : Installing The Optical Drives, Installing The Hard Drives >>>