


 Add to Reddit

Step 8 : Turn Off Prefetcher & Superfetch
Microsoft Windows use two techniques to improve boot and application loading times, which they named Prefetcher and Superfetch. The Prefetcher was introduced in Windows XP, while Superfetch was introduced in Windows Vista.
Unfortunately, these two features are pointless if you are using a solid state drive as a boot drive. This is because files on an SSD load at the same speed irrespective of where they are located, even if they are fragmented. So all Prefetcher and Superfetch do is generate unnecessary writes to the solid state drive, and take up extra memory for no benefit at all.
This is the reason why Microsoft have designed Windows 7 and Windows 8 to disable both features if they detect the presence of an SSD. However, many users have noted that Prefetcher and Superfetch remain active even with an SSD in the system. That's why we must always verify that both Prefetcher and Superfetch are turned off. You will likely find them enabled, especially if you are using Windows 7 or older.
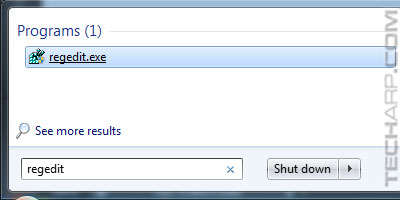
- Open the Registry Editor by typing "regedit" in the Start search box and clicking on regedit.exe as shown below, or going to drive:\Windows\regedit.exe.
-
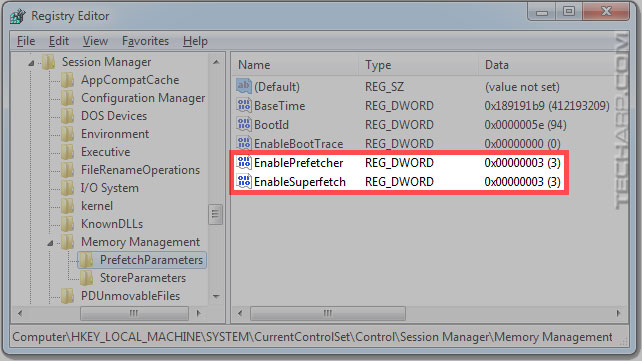
In the Registry Editor, go to HKEY_LOCAL_MACHINE\SYSTEM\CurrentControlSet\Control\Session Manager\Memory Management\PrefetchParameters.
- Look for EnablePrefetcher and EnableSuperfetch. If you are using an SSD, they should both have a value of 0 (Disabled). However, in this case, it's still set to the default value of 3 (Enabled with all features).
-
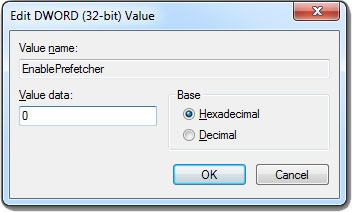
Double-click on EnablePrefetcher, and in the pop-up, type 0 in the Value data box. Then click OK.
-
Double-click on EnableSuperfetch, and in the pop-up, type 0 in the Value data box. Then click OK.

-
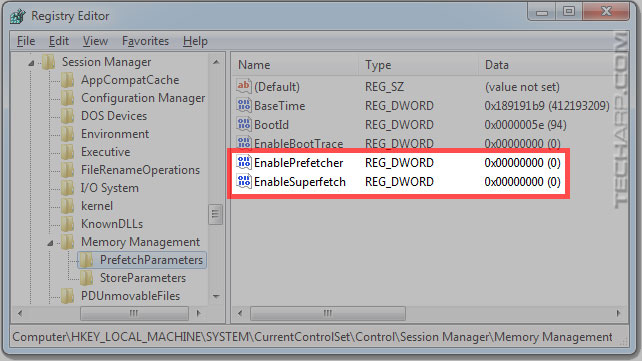
After you have done so, Registry Editor should show the two values as such :
-
Now all you have to do is restart Windows. The changes will take effect after you restart Windows.
Tech Explainer The Prefetcher works by tracing and logging the files that are loaded every time you boot up or run an application, and storing them in Prefetch files. Windows can then use them to re-order disk reads or eliminate the repetitive reading of the same files. In addition, Windows will call upon the built-in Disk Defragmenter utility every 3 days to move those files into sequential positions on the outer tracks of the hard disk drive, so they will load much faster. If you are using a third-party defragmentation software, it will also use the Prefetch files to move the same files to the outer tracks of the hard disk drive. The possible values for EnablePrefetcher are :
Superfetch, on the other hand, analyses your usage patterns to predict (up to) the next 3 applications that you are likely to load next at any particular time of the day. It then uses the Prefetch data to preload the necessary files into memory, so that if you do launch those applications, they will load very quickly. The possible values for EnableSuperfetch are :
|
| If you like this article, please share it! -> |
Step 9 : Use A RAM Disk
A RAM disk (also known as RAM drive or virtual RAM drive) turns RAM into a logical disk drive for temporary storage purposes. Although it was not popular in the past due to the high cost of computer memory, it is now making a comeback, partly because RAM is now cheap and plentiful and partly because SSDs are fast replacing hard disk drives as the storage medium of choice.
SSD users are particularly interested in using the RAM disk to reduce wear and tear on the SSD by shifting some of the work to it. This also has the effect of maintaining the SSD's optimal performance, and to a certain extent, actually improving on it.
-
Speed - SSDs are fast, but a RAM disk is much faster because it uses RAM as its storage medium. Current DDR3-1600 memory from 2008 is 30-40x faster than typical desktop SSDs.
-
Reduces bottleneck - A RAM disk runs off the much faster memory interface, instead of the slower SATA interface. Offloading part of the workload to a RAM disk therefore reduces the load on the SATA interface, allowing more operations to occur simultaneously.
-
Auto-Clearing - Data in a RAM disk is automatically cleared every time the computer shuts down, instead of accumulating and wasting space as they do on regulars drives.
-
Security - Data that is cleared when a RAM disk is restarted is irrevocably lost because RAM cannot retain data for more than a second or so without power.
-
No lifespan issues - Unlike the NAND flash memory used in SSDs, RAM has no wear and tear issues. It won't wear out even if you use it at full load 24/7.
- Maintain your SSD's performance and lifespan - By shifting temporary file storage and caching to the RAM disk, this not only reduces the wear and tear load on the SSD, but it also helps to maintain the SSD's performance over time.
On the other hand, there are circumstances where a RAM disk should never be used :
-
Not enough RAM - This is subjective and depends on your usage, but generally, we do not recommend that you use a RAM disk unless you have at least 6 GB of RAM.
-
To place a paging file - Although it is possible to do so, placing the paging file on a RAM disk is absurd because it would be transferring water from one storage tank to another and then back again.
-
The data is important - It is NOT a permanent storage medium, so you should never store your documents on it. Any data that is stored on a RAM disk is permanently lost if the computer crashes or shuts down.
Creating and using a RAM disk goes beyond the purview of this general guide. Fortunately, we have a step-by-step guide on how to create and use a RAM disk, which we rather unimaginatively named The RAM Disk Guide. Please follow the instructions in that guide if you want to use a RAM disk to reduce the load on your SSD and maintain its performance.
| If you like this article, please share it! -> |
Support Tech ARP!
If you like our work, you can help support out work by visiting our sponsors, participate in the Tech ARP Forums, or even donate to our fund. Any help you can render is greatly appreciated!
<<< How To Optimize Your SSD : Steps 6 - 7 : Previous Page | Next Page : How To Optimize Your SSD : Steps 10 - 11 >>>
Support us by buying from Amazon.com! |
|
| Grab a FREE 30-day trial of Amazon Prime for free shipping, instant access to 40,000 movies and TV episodes and the Kindle Owners' Lending Library! | |